A lot of you who follow me on LinkedIn probably remember that I bought a VPS server a while back. I paid for a full year upfront—mainly so future me wouldn’t have to think about it (great decision, by the way).
For the longest time, that server just sat there… existing. No real purpose. Just quietly burning money and collecting digital dust because I couldn’t get around to setting things up.
But recently, I finally carved out some time - and here’s what I ended up doing.

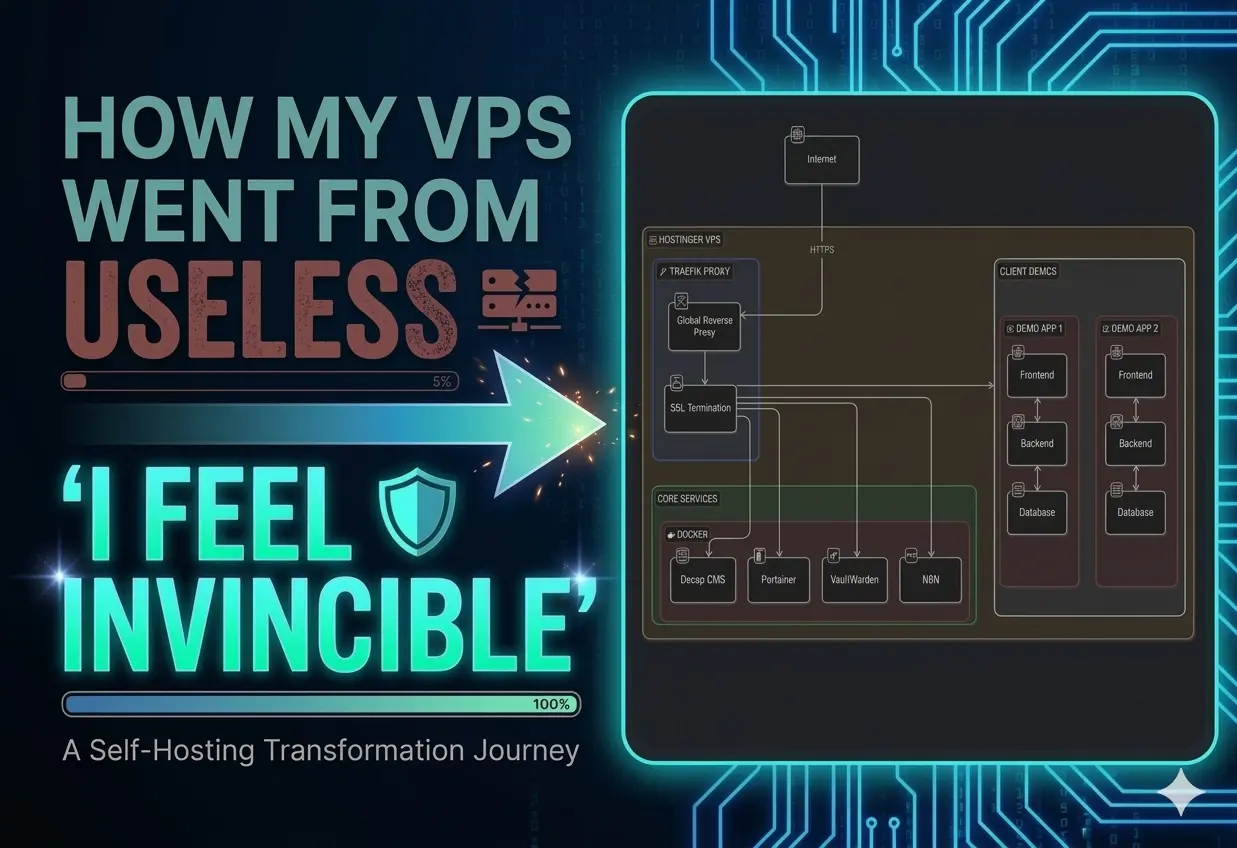
Getting Started: Reverse Proxy with Traefik
The first thing I set up was a reverse proxy using Traefik.
The idea was simple: centralize everything. Any traffic hitting my VPS should go through Traefik, which would then decide where it needs to go. It also blocks unnecessary requests, which gives a small but useful layer of protection against random internet noise constantly poking your server.
Sounds straightforward, right?
Yeah… no.
This step looked fun and easy. It was not. It took me about a week of trial, error, and mild existential dread to get it working properly.
At one point, I convinced myself that exposing the Traefik dashboard publicly was a good idea (spoiler: it was not). I even managed to bypass the built-in safeguards Traefik puts in place to stop you from doing exactly that.
And then, buried deep in the documentation, I found the equivalent of:
“Please don’t do this in production.”
Cool. Cool cool cool.
Moral of the story:
Stop blindly trusting AI-generated configs and actually read the docs… you buffoon.
The “Aha!” Moment
After wrestling with the documentation for what felt like a month, things finally clicked.
Traefik is actually very simple conceptually:
- You run a single Traefik container
- That’s it
- Everything else is configured using Docker labels
Those labels are incredibly powerful. You can:
- Route traffic based on subdomains
- Automatically generate SSL certificates
- Set up load balancing
- And a lot more
Once you understand this, everything becomes much easier.
Here’s the config I used:
name: traefik

services:
  traefik:
    image: traefik:latest
    restart: unless-stopped
    command:
      # Logging
      - '--log.level=INFO'
      - '--accesslog=true'

      # Docker provider
      - '--providers.docker=true'
      - '--providers.docker.exposedbydefault=false'
      - '--providers.docker.network=traefik'

      # Entrypoints
      - '--entrypoints.web.address=:80'
      - '--entrypoints.websecure.address=:443'

      # SSL Configuration
      - '--certificatesresolvers.letsencrypt.acme.tlschallenge=true'
      - '--certificatesresolvers.letsencrypt.acme.email=youremail@gmail.com'
      - '--certificatesresolvers.letsencrypt.acme.storage=/letsencrypt/acme.json'

      # Global HTTP to HTTPS redirect (disabled for testing)
      - '--entrypoints.web.http.redirections.entrypoint.to=websecure'
      - '--entrypoints.web.http.redirections.entrypoint.scheme=https'
      - '--entrypoints.web.http.redirections.entrypoint.permanent=true'

    volumes:
      - '/var/run/docker.sock:/var/run/docker.sock:ro'
      - './data/letsencrypt:/letsencrypt'
      - './data/traefik:/etc/traefik'

    labels:
      # Enable Traefik for this service
      - "traefik.enable=true"

    ports:
      - "80:80"     # HTTP
      - "443:443"   # HTTPS

    networks:
      - traefik

networks:
  traefik:
    name: traefik
This simple config does the following things:
- It makes sure any HTTP requests are redirected to HTTPS endpoints
- SSL Configuration: A general configuration for all the applications. This is the email it will use while generating the certificates. You should be familiar with this if you have ever maintained a production server manually or if you automated the SSL certification process.
- Enables Docker provider, which will come in handy later when we expose our containers using labels
- You mount permanent volumes to maintain the certification and data information for Traefik; this is similar to what nginx does in its config file.
- Exposes the right ports for usage.
- Creates a Docker network called traefik. Now this network is important. You need at least one network upon which you should be able to connect your applications. This is how Traefik actually discovers your containers, by a common network. Of course, you can have an application-specific network and connect the above configuration to that network.
The “I Am Invincible Now” Phase
Once Traefik is working, something changes.
You suddenly feel unstoppable.
Deploying apps? Easy. Routing domains? Easy. SSL? Automatic.
Everything becomes “just another YAML file” 😂
First Deployment: N8N
With my newfound (and slightly dangerous) confidence, I decided to self-host something useful.
Enter: N8N
Here’s the config I used:
name: n8n

services:
  n8n:
    image: n8nio/n8n:latest
    restart: unless-stopped

    environment:
      - N8N_HOST=n8n.osafalisayed.com
      - N8N_PORT=5678
      - N8N_PROTOCOL=https
      - WEBHOOK_URL=https://n8n.osafalisayed.com/

      # security
      - N8N_EDITOR_BASE_URL=https://n8n.osafalisayed.com
      - NODE_ENV=production

      # timezone
      - TZ=UTC

    volumes:
      - ./data/n8n:/home/node/.n8n

    labels:
      - "traefik.enable=true"

      # router
      - "traefik.http.routers.n8n.rule=Host(`n8n.osafalisayed.com`)"
      - "traefik.http.routers.n8n.entrypoints=websecure"
      - "traefik.http.routers.n8n.tls.certresolver=letsencrypt"

      # service
      - "traefik.http.services.n8n.loadbalancer.server.port=5678"

    networks:
      - traefik

networks:
  traefik:
    external: true
This setup:
- Routes traffic to n8n.osafalisayed.com
- Automatically provisions SSL
- Connects to the Traefik network
- Exposes the service correctly
And just like that… it worked.
Unless you forget the network part—then you’ll go bald debugging it.

After the right setup It becomes extremely easy to deploy applications, I took the liberty to deploy Portainer, Firefly-iii.
Future plans
I have lots and lots of plans for this server for example:
- I will self host my full-stack applications I have created here. For a client this will become an interactive demo. Meaning they will have no doubts in my capability of making production grade software.
- I do not need Vercel anymore for deploying the applications on staging, I can temporarily deploy them on my custom server and get a nice feedback from my client.
- I want to somehow take backup for all my dockerized data on the VPS to my local system. This will allow to replicate the entire thing without losing my data again on another server.